

The Key Holder Wall Hanging Quilt is the perfect gift for guys!
It can be hung in a garage or an entryway to the home. You can make it larger or smaller as needed for your space and needs.
At no extra cost to you, I may receive a small commission from purchases made through affiliate links, which allows me to continue bringing you awesome free content! This post contains affiliate links.
Block quilting or pixel quilting is super fun! You can make any pixelated image into a quilt, giving you endless gift possibilities.
Well, my love for quilting and need for a key holder collided and ideas ran amuck. Isn’t that how the best projects come to be?
Make your own Key Holder Wall Hanging Quilt!
Materials
1/2 yds of Fabric A (Background) [White Canvas]
1/2 yd each of Fabric B (Letters) [Gray]
1/2 yd of Fabric C (Backing) [Solid Black]
1/2 yd of Batting
3 yds of Double Fold Bias Tape
30″ Jute Twine
2 – 3/8″ Buttons
Keyring Clips or Mini Plastic Buckles
3/8″ x 36″ Wooden Dowels
Pins
Basting Spray
Quilting Ruler
Rotary Cutter
Iron
Sewing Machine
Machine Thread
Finished Measurements
29″ W x 15.5″ H approximately
Skill Level
Easy
Craft Time
Under 5 hours
Notes
- 1/2″ Seam Allowance used.
- Attach right sides together.
- The finished size can be adjusted by subtracting the same amount on the length and width of each piece (example: if it says 3″ x 11″ and you want to shrink it by 3/4″, cut 2.25″ x 10.25″)
- The seam allowance can be changed to 1/4″ to save on fabric, just remove 1/2″ from each measurement. Example: if it says 3″ x 11″, cut 2.5″ x 10.5.
Cutting
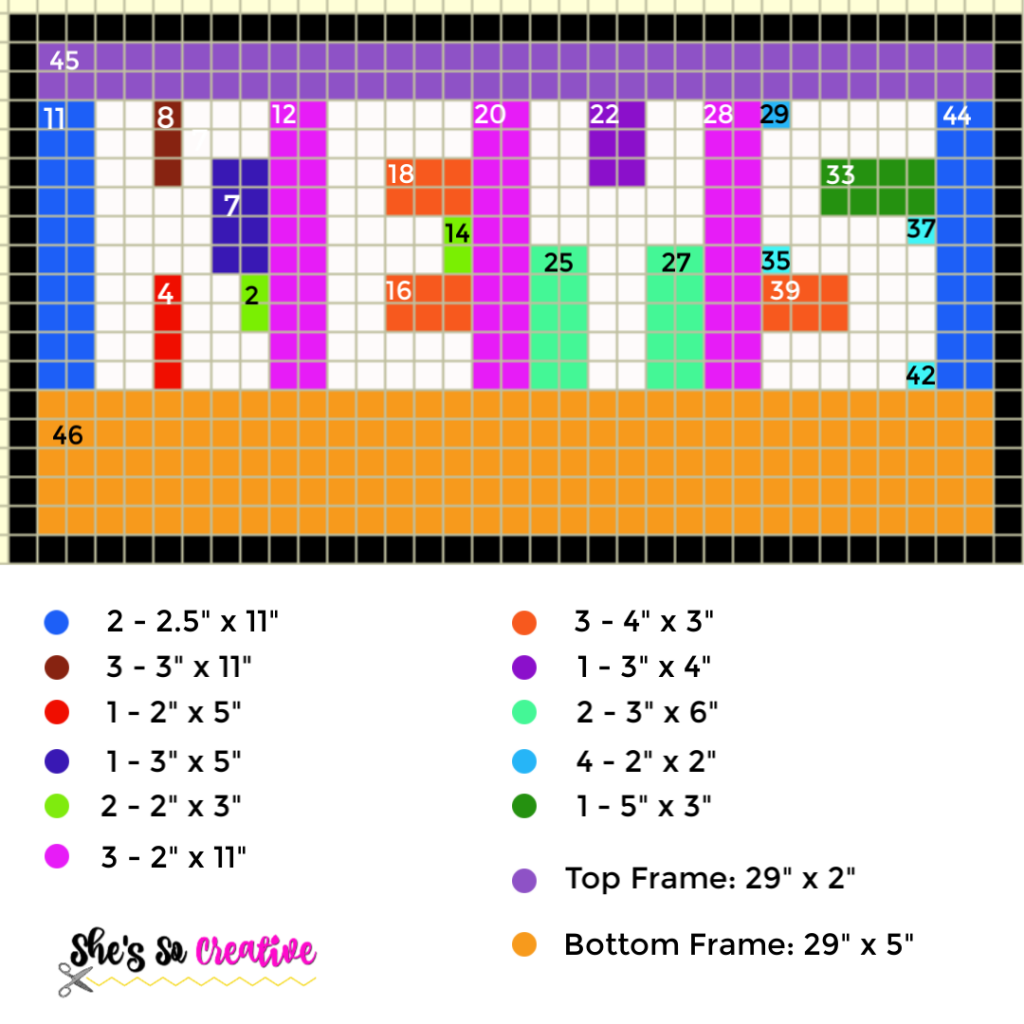
Cut Fabric A (Background) into the following pieces:
2- 2.5″ x 11″
3 – 2″ x 11″
1 – 3″ x 4″
1 – 3″ x 5″
2 – 3″ x 6″
4 – 2″ x 2″
2 – 2″ x 3″
1 – 2″ x 4″
1 – 2″ x 5″
3 – 4″ x 3″
1 – 5″ x 3″
For top and bottom (background) pieces: measure your piece after it’s finished to determine width, but it should be approx. 29″. Top piece is 2″ high, bottom piece is 5″ high.
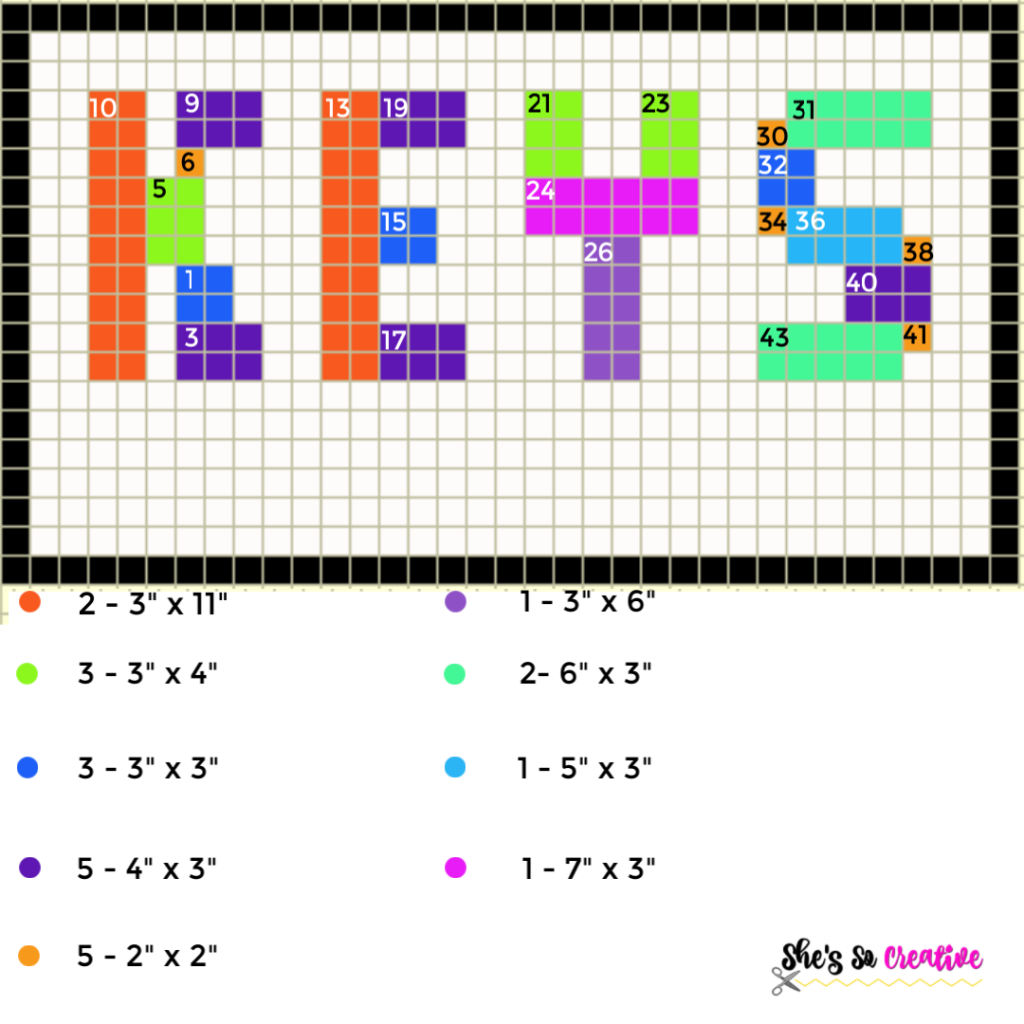
Cut Fabric B (Letters) into the following pieces:
2 – 3″ x 11″
3 – 3″ x 4″
1 – 3″ x 6″
3 – 3″ x 3″
5 – 4″ x 3″
2 – 6″ x 3″
1- 7″ x 3″
1 – 5″ x 3″
5 – 2″ x 2″
Cut Fabric C and Batting: Measure finished top panel and cut matching size piece from backing fabric.
Sewing
Following the graphic below, attach the pieces as listed:
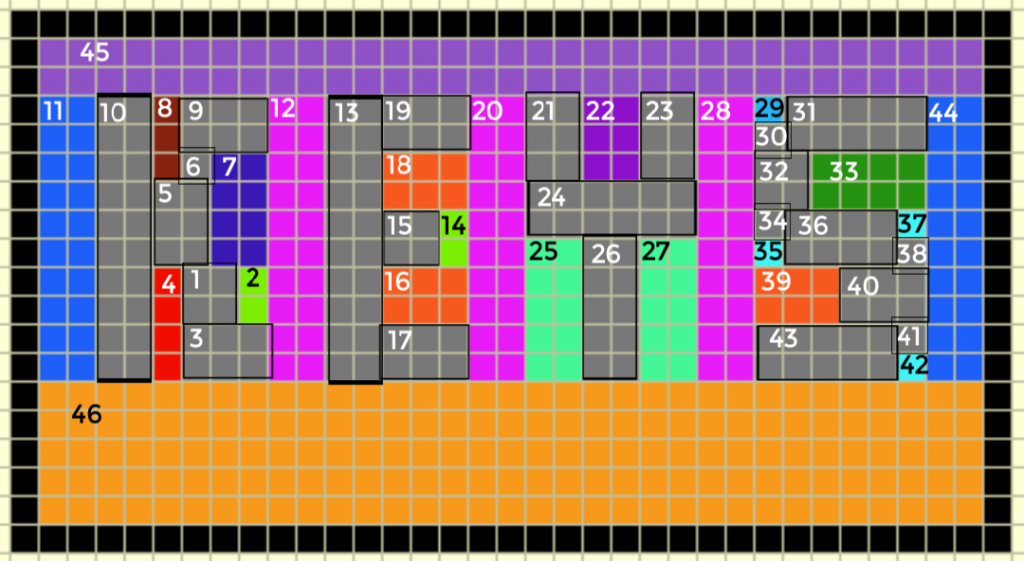
-K-
1 => 2
1 + 2 => 3
1 + 3 => 4
5 => 6 — Line piece 6 on the top right corner of piece 5. Leave a 1/2″ of the left side of piece 6 unworked, so piece 8 can be attach later.
5 + 6 => 7
4 + 1 + 2 => 5 + 7
9 => 6 + 7 — Line piece 9 on the top left corner of piece 6.
8 => side of 6 + 7 + 9 and top of 5
10 => 4 + 5 + 8
11 => 10
12 => 9 + 7 + 2 + 3
-E-
13 => 12
14 => 15
14 + 15 => 16
16 => 17
14 + 15 => 18
18 => 19
13 => 19 + 18 + 15 + 16 + 17
20 => 19 + 18 + 14 + 16 + 17
-Y-
21 => 22
22 => 23
21 + 22 + 23 => 24
25 => 26
26 => 27
25 + 26 + 27 => 24
21 + 24 + 25 => 20
23 + 24 + 27 => 28
-S-
29 => 30
29 + 30 => 31
32 => 33
30 + 31 => 32 + 33
34 => 35
34 + 35 => 36
37 => 38
37 + 38 => 36
39 => 40
39 + 40 => 35 + 36 +38
41 => 42
41 + 42 => 43
41 + 43 => 39 + 40
44 => 31 + 33 + 37 + 38 + 40 + 41 + 42
45 => across the top
46 => across the bottom

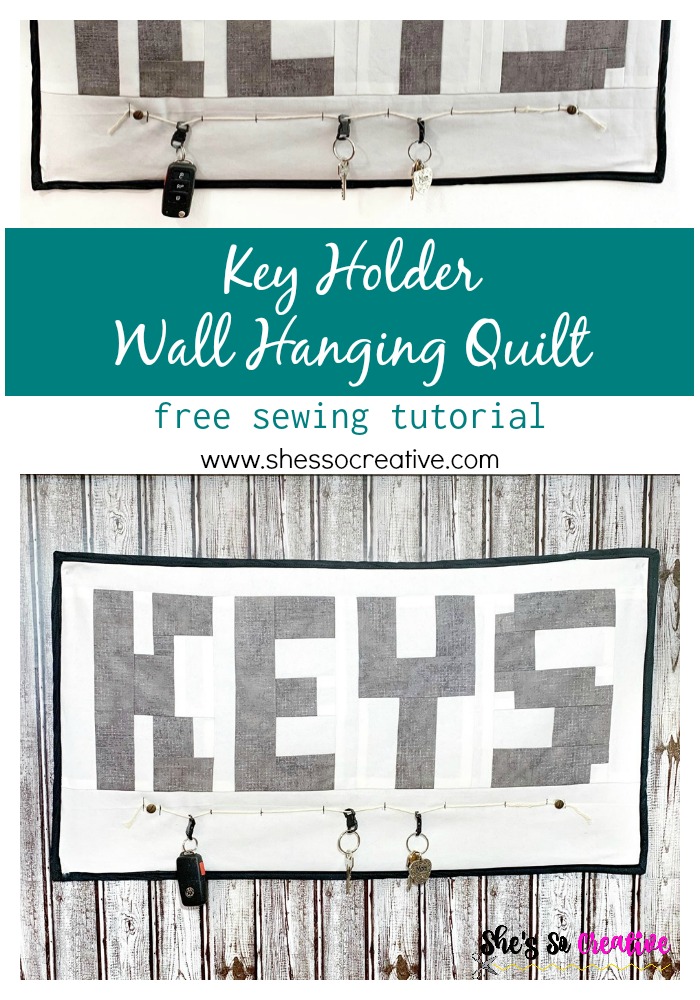
>>Trim excess fabric around each side.
>>Cut backing fabric and batting.
>>Lay backing fabric wrong side up, lay batting over the backing, then lay the top panel right side up onto the batting. Smooth out the layers to get out wrinkles and bumps.
>>Fold back the top panel and batting half way and spray the backing with basting spray. Lay flat and smooth out again. Repeat on other half. Then repeat this same step folding back just the top panel and spray the batting.
>>Create corner pockets for the back: Cut 4 – 4.5″ x 4.5″ squares of any fabric and fold them all in half diagonally creating triangles. Fasten triangles to each corner, so the folded edge is facing towards the center.
>>Quilt as desired (I prefer stitch in the ditch for a project like this).
>>Add bias tape around outside, over all layers, including corner pockets.
>>If using shank buttons, add them to the twine and tie knots in each end. If using closed clips, you’ll want to add those to the twine too, before you tie knots.
>>Center the jute twine along the bottom of the top panel, 1″ below the letters.
>>Stitch vertically across the twine on each side of the buttons to fasten into place, then stitch vertically across the center of the twine (evenly space) to secure it and create spaces to hang keys (slide clips over as needed). Note: skipping this part will cause the weight of the keys to tug on the fabric and it won’t lay flat.
>>Insert dowels into the corner pockets.
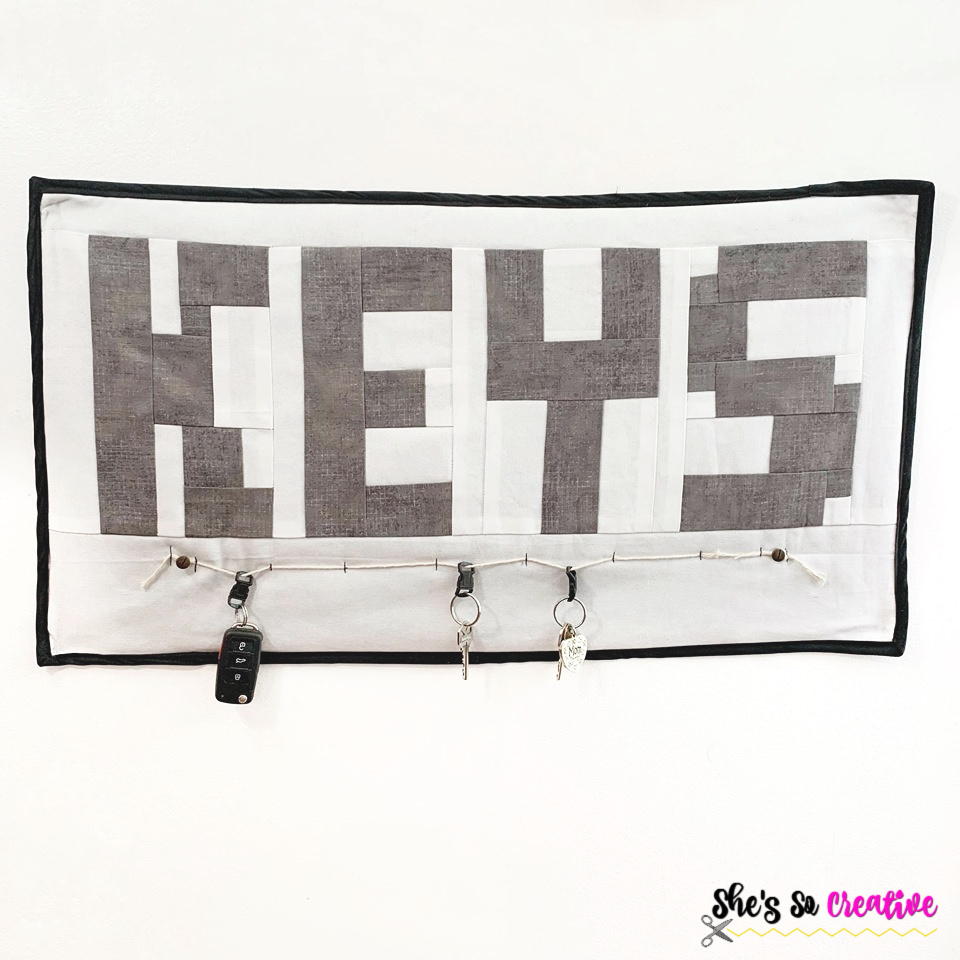
There you have a Key Holder Wall Hanging Quilt! What do you think?
You may also like the Modern Log Cabin Quilt
or the Simple Beginner Quilt!
Thank you for crafting with me today!
Come on over and join the She’s So Creative Crafter Community! And don’t forget to like me on Facebook and Instagram!

Written pattern and photographs © 2019 Sonya Blackstone of She’s So Creative. Please do not sell, share, or modify this pattern, but instead share the link to where the pattern can be found. Do not use these photos for advertising without written permission. Do not post this tutorial on your own website without written permission. You may sell any finished items you create using She’s So Creative tutorials.
Sonya Blackstone is a participant in the Amazon Services LLC Associates Program, an affiliate advertising program designed to provide a means for us to earn fees by linking to Amazon.com and affiliated sites.